Validating your site in the Google Search Console has evolved substantially over the years, with some of the latest updates now allowing for Google domain verification.
Put simply, Google Search Console verification can provide huge benefits for any domain with multiple attached subdomains. For example, with the new domain verification system, you’ll now be able to see an aggregate view of all the data for the entirety of your domain network.
Once domain validation is set up, you can also quickly validate new sub-domains or sub-folders that you want to view separately in the Google Search Console.
You no longer need to attempt validation via Google Analytics or Google Tag Manager, which can be at times problematic, and you won’t need to rely on the fallback method of uploading a file to the server, which, again, adds to delays.
Instead, Google Search Console verification makes the whole process incredibly streamlined and easy to follow.
In fact, you can complete your domain verification today using the steps shown in the video, but we’ve also outlined it in full below:
How to set up your domain verification
In order to begin the verification process, you’ll require one key thing: access to your specific domain provider so you can amend your domain’s DNS settings. With this, finalising your Google Search Console verification is simple.
Step 1
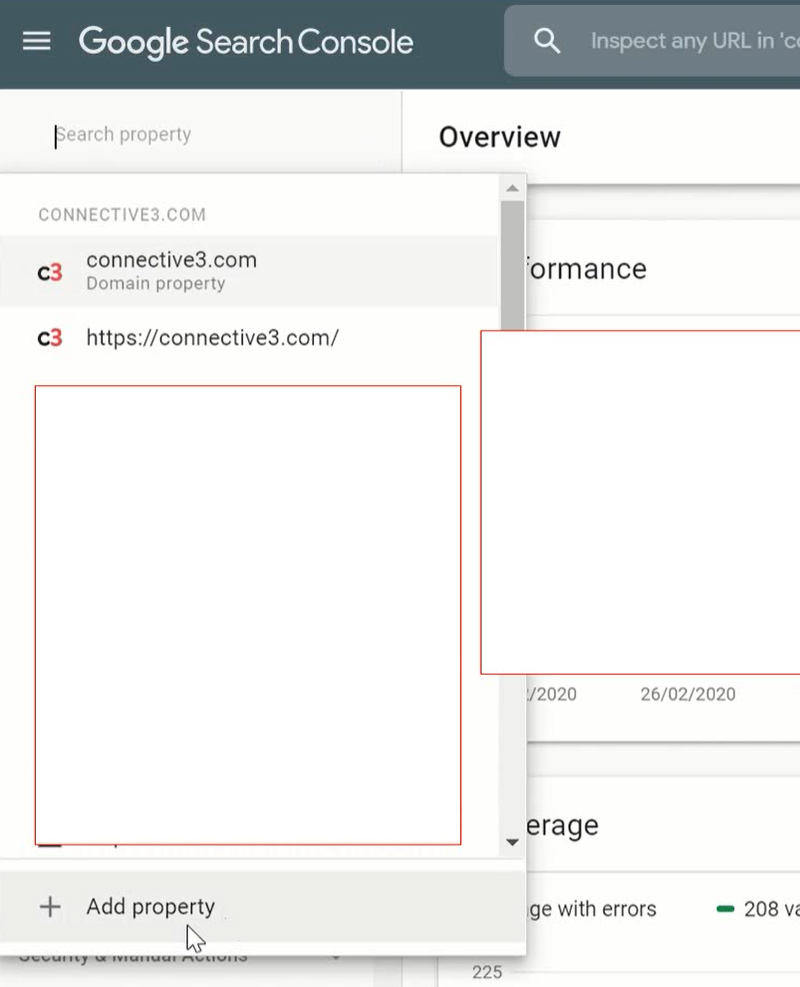
To begin, go to the Google Search Console and click the drop-down for the domain property in the top right corner.
Upon clicking it, you’ll be presented with a list. Scroll to the bottom of the drop-down box and select add property.
Step 2
Now that you have access to the property box, select domain and type in the domain you want to verify.
Once you’ve done this, click continue and you’ll be provided with a TXT record that you’ll need to add to your DNS. Copy the Google Search Console verification code and click verify later.
Before we can complete the domain verification, we first need to access our current domain provider DNS settings.
Step 3
You now need to log in to your domain provider, to access your domain’s DNS settings. For our example, we’ll use Microsoft.
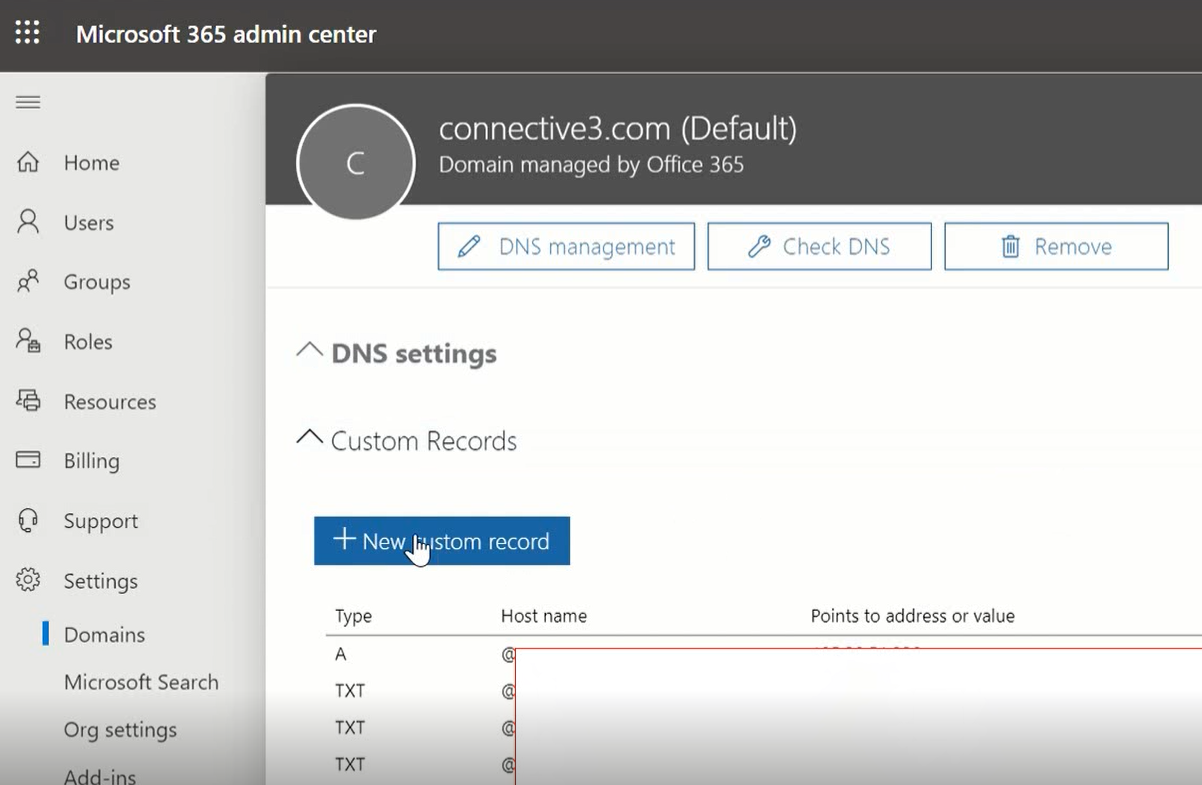
With Microsoft, you log into the admin portal, go to settings, and select your domain. Once your domain is selected, you need to click on New Custom Record.
Now select the TXT (Text) value box and paste your previously-copied Google Search Console verification code into the field.
Once you’ve saved this, you’ll need to wait for the domain settings to propagate the web (this can take anywhere from 10 minutes to a maximum of 48 hours). You can check the status using providers such as Dnschecker.org to alert you as to when the process has been completed.
Step 4
When the changes have been fully propagated, you’ll need to verify your domain to use the updated settings.
Click on the drop-down Properties menu on the top left of Search Console, and scroll to the bottom of the list. At the bottom will be a section that reads Not Verified Sites. All you need to do is click on the site you want to be verified.
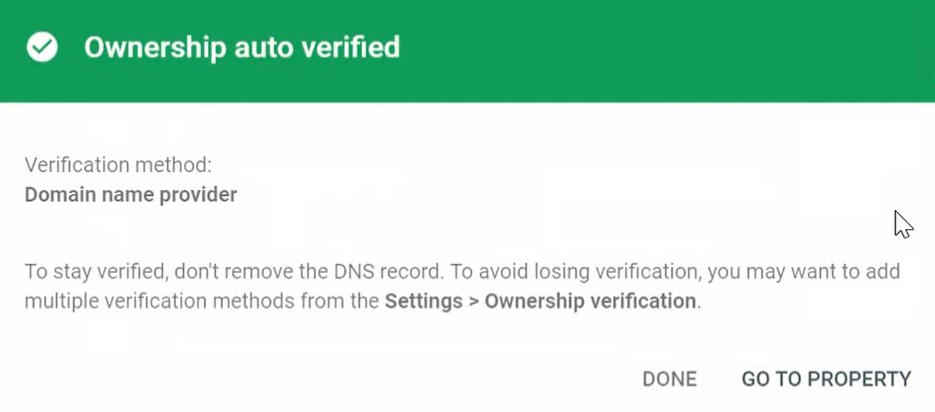
Once selected, if everything relating to the changing of your DNS has been completed correctly, your site will verify properly and your Google Search Console verification will be finished.
And best of all, once your primary domain verification is verified, all of your sub-domains, sub-folders, and associated URLs under that domain will auto-verify as well.
Domain verification is just one of many things you can do with the Google Search Console and Google in general. We’ve also touched on how to use Google App Scripting to streamline your use of Google Apps, and there are many more articles like this over on our blog.
But it’s not just tech help we offer. Check out our other services, ranging from paid search to content strategy and SEO. Who knows? We might be able to take your business to even greater heights.
Most businesses want to know how their marketing efforts are performing, which is why we use tools like Google Analytics to track behaviour on our websites and determine where our potential customers are coming from.
But Analytics has a problem: if a lead fills in a form, the connection between campaign and customer interaction is lost without doing some customised setup. UTM parameters are lost when the user moves around the website, so unless we are sending traffic directly to our contact page, we are unlikely to be able to track the source within our contact form.
In this post, we are going to show how you can perform some simple attribution using ContactForm7 on your WordPress website, and determine where that lead came from. To do so, we will be persisting the source across pages during the session and pushing that information with the form fill so we can determine how that lead landed on our website.
Google Tag Manager Tag Template
For this implementation we are going to use Simo Ahava’s Persist Campaign Data Tag template which will create the session cookies needed for you via GTM.
To apply this to your container once in Google Tag Manager, use the left navigation to access the ‘Templates’ section of the container:
Search the gallery for ‘persist campaign data’ and once you have the sidebar open for the template, click ‘Add to Workspace’ to add the template to your GTM container.
Next, we need to configure the tag to drop deploy a cookie which will track our campaign URLs. Navigate to the tags section of Google Tag Manager using the left navigation, and create a new tag.
When searching for the tag type, we need to search for ‘persist campaign data’ again to use the template we have applied.
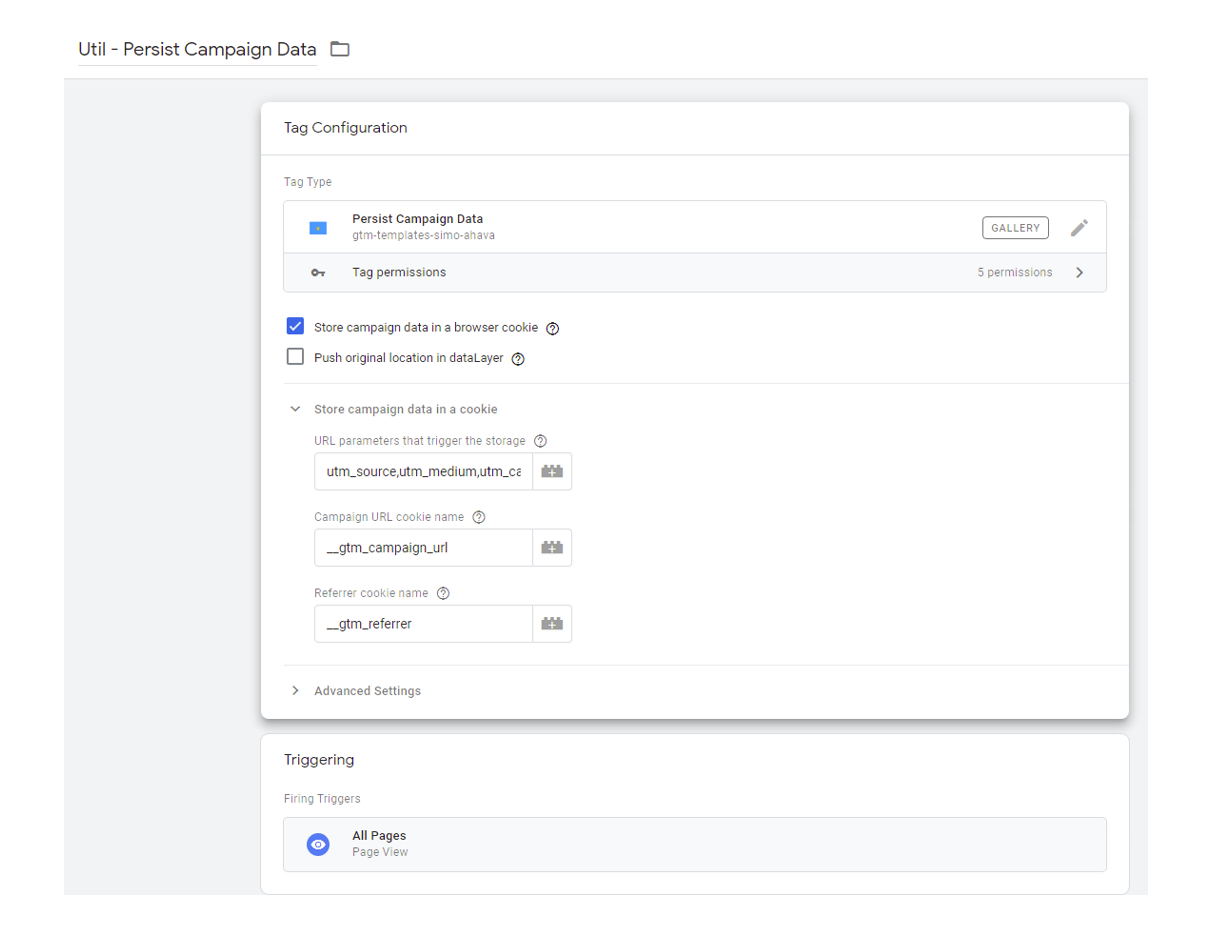
utm_source,utm_medium,utm_campaign,utm_term,utm_content,utm_id,gclid
Everything else has been left as default, and we have added the ‘all pages’ trigger to ensure no matter where the user lands on our website, we have the ability to track their source.
How this template works
The persist campaign data tag template works by matching the parameters set in the ‘URL parameters that trigger the storage’ field. Should those appear in the URL which the user lands on, a cookie is created with the name defined in the ‘Campaign URL cookie name’ field. In our case, it’s ‘__gtm_campaign_url’.
A cookie is also placed containing the referrer. This cookie is named as is set within the ‘Referrer cookie name’ field, and in our case, this is ‘__gtm_referrer’. We are going to use both as part of our analysis.
Using the EditThisCookie extension for Chrome, we can see the __gtm_campaign_url cookie containing the UTM parameters. The value is URL encoded which is why special characters have been replaced, but all source, medium and campaign have been assigned as ‘test’.
Reading Cookies with GTM
In your Google Tag Manager container, navigate to the variables section and create two new variables: one for the campaign url cookie and one for the referrer cookie.
When choosing the type of variable, select 1st party cookie.
Insert the cookie name, either __gtm_campaign_url or __gtm_referrer depending on which variable you are creating. Ensure that you also tick the box for ‘URI-decode cookie’. This will decode the string back into a more readable format.
Once the cookies are set up, if you were to look in the GTM preview mode to see how those appear, they would look something like this:
Creating ContactForm7 Hidden Fields
To transport our data, we need a way of pushing the data through with the form fill, and to do this, we will be using hidden fields. The user doesn’t see these fields and doesn’t have to fill them in manually, but we will use Google Tag Manager to populate them with the data contained in our cookies.
First, we need to create a set of hidden fields. In your WordPress admin section, navigate to the ContactForm7 plugin and either create a new form or edit an existing one.
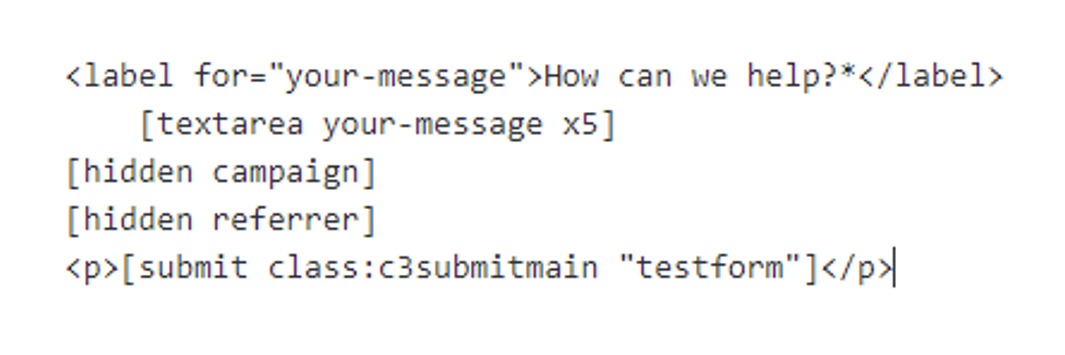
Once you are happy with the form, add two fields just before the submit button by inserting ‘[hidden campaign]’ and ‘[hidden referrer]’ as shown below:
By adding campaign and referrer into the field, we give our field a name that we can use later to tell GTM where to put the information.
Post the form to the live website and make sure the form is still working correctly and visually looks OK on the page.
Placing Campaign Data into the Hidden Form Fields with GTM
We now need to create two Custom HTML tags to transfer the data from cookie to hidden form field. Navigate to the tags section in GTM and add a new tag. Choose Custom HTML as the tag type, and insert the script below, editing the value and selector variables to include the cookie and css selector of the form field, leaving the speech marks in place.
<script>
(function () {
var value = “insert cookie variable to be written”
var selector = “insert css selector of the hidden field”
var field = document.querySelector(selector)
if(field){ field.value = value; }
})();
</script>
If you are using the same naming convention as this post, then the css selectors for each will be the below as denoted in your WordPress admin section.:
- Input[name=campaign]
- Input[name=referrer]
Here is the full tag configuration:
Repeat this process for the referrer cookie, and once completed, both will be ready to transport data from cookie to form field. Now we need to trigger these scripts. Navigate to the triggers section of Google Tag Manager and create a new trigger.
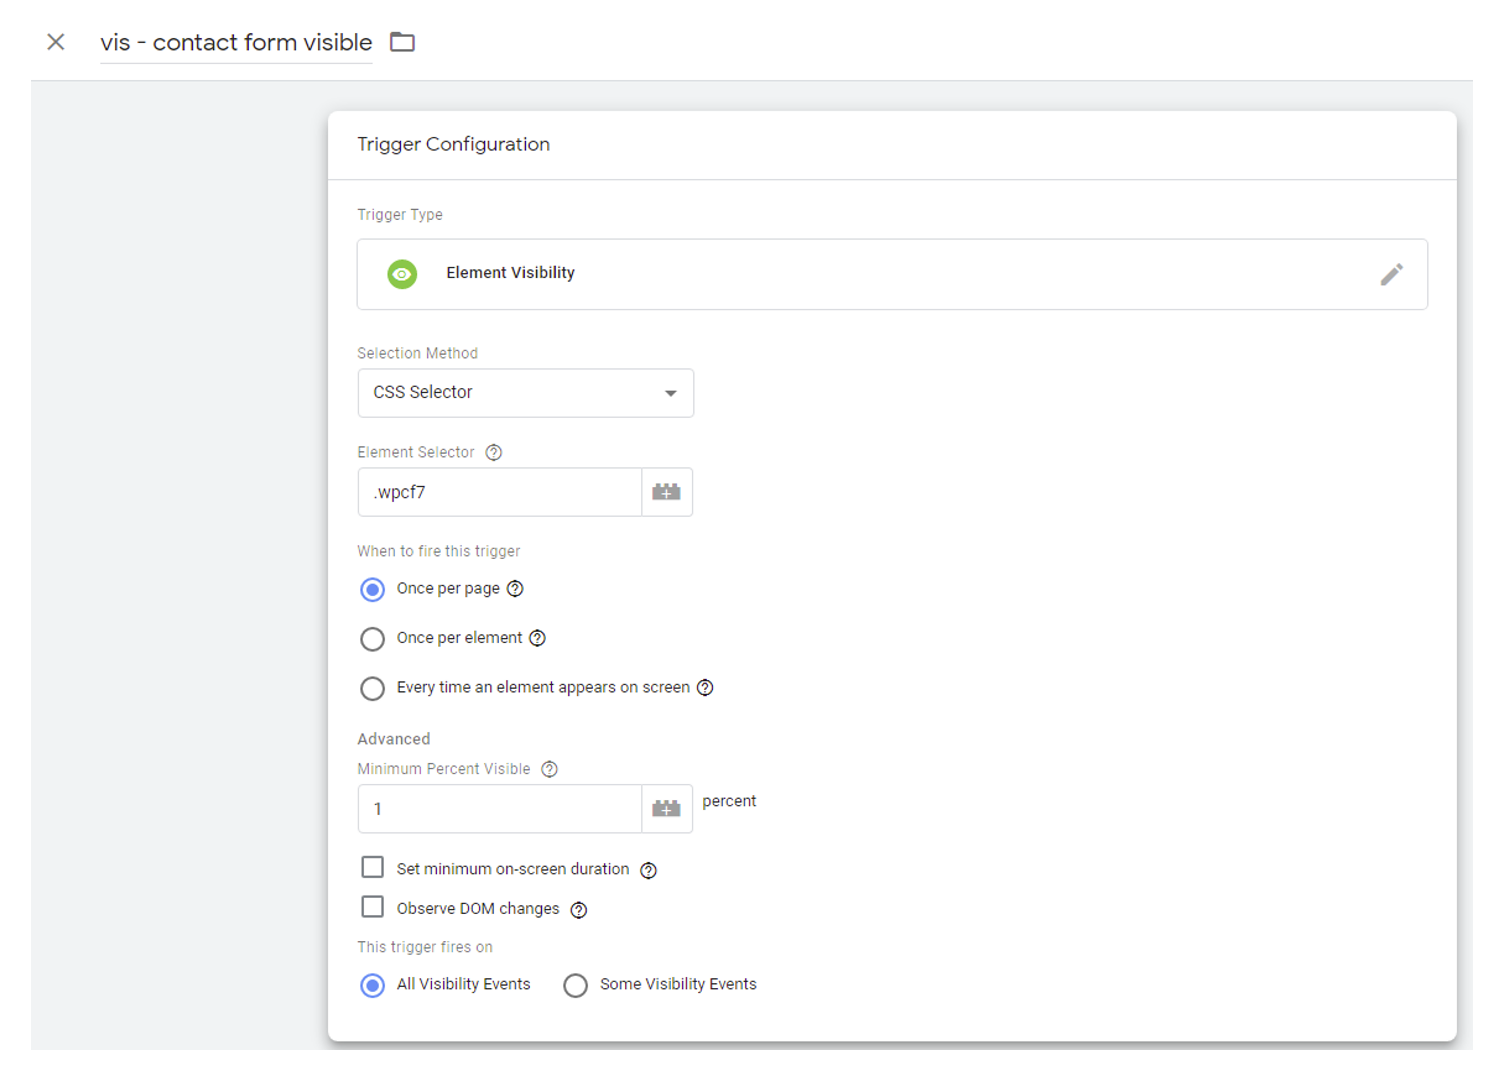
In this example, we have used an element visibility trigger so that no matter where on the website the form is placed, it will always be picked up by the trigger. If you only have one form though, you may wish to use a pageview trigger to denote where the form is.
In our element visibility trigger, we have used CSS selector as the method for determining selection, and then we have used the class ‘wpcf7’ as this class is given to all ContactForm7 forms. In the element selector box we enter ‘.wpcf7’ where the ‘.’ denotes this is a class which is being looked for.
We only want this to fire once per page to prevent duplicated pushes to the value, and then we want to trigger at 1 percent visible so that as soon as the element is seen, our data is transported; even before the user has started to enter their contact information.
The full configuration looks like:
Connect this trigger up to your Custom HTML tags which are set to move the campaign and referrer url data. Then go into preview mode to test the integration is working.
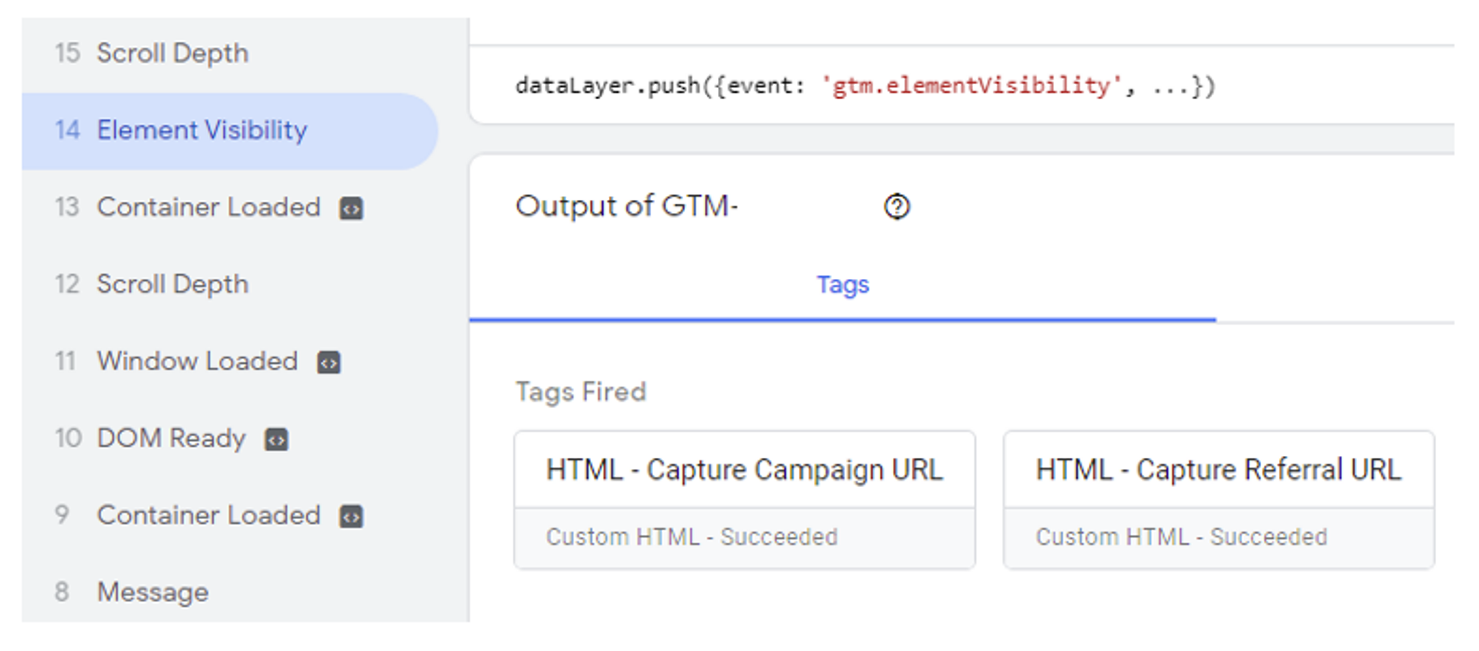
If you’re using the same trigger method as this example, then when you view a contact form, your preview mode for GTM should show an element visibility event. Clicking into this will show you the tags fired. As you can see in the image, both our our HTML tags have fired successfully.
To check the form field values, you should use the developer console. The easiest way to get close is to right-click one of the visible form fields and choose ‘inspect element’ from the drop-down.
We are looking for inputs with the type ‘hidden’. You can see in the image below that the ‘value’ attribute of our campaign field is now the same as the cookie __gtm_campaign_url with the string of UTM’s captured.
If you want to see the field actually in the form on-screen for testing, you can double-click ‘hidden’ and instead type ‘visible’ to expose the field in your browser, but the value attribute will also be the value seen in the field.
Once you’re happy that you are capturing the correct information, head back to Google Tag Manager and publish the container to the live website.
Testing the Integration
There is one final step to take before we start to receive this information within our inbox. We have to alter the email ContactForm7 sends out on form submission.
To do this, go back into your WordPress admin section and find the form within the ContactForm7 plugin. This time, switch the panel from ‘Form’ to ‘Mail’:
This section lets you customise the email sent when a form is submitted.
In the message body, configure the message to your preference and then at the bottom, include the campaign and referrer fields by inserting ‘[campaign]’ and ‘[referrer]’. These are the names given to the fields if you have opted for something different.
In our example, we’ve included labels so it is obvious which link is the campaign, and which is the referrer:
Save the form and then go to the website where you will fill in the form to test the integration (or just wait until you see a form fill come through). Once you have filled out the form, you will receive an email with the information contained within:
So how to analyse this information? If you’ve followed this guide and included the gclid as part of your tracking, then here’s some examples of how to analyse the data. Remember that the UTMs will be dependent on how you have tagged up your campaign links:
- Paid Search -> Campaign URL: Contains a ‘gclid’ parameter
- Organic -> Campaign URL is undefined, referrer is a search engine i.e. https://www.google.co.uk
- Email -> Campaign URL: Contains UTM string i.e. utm_source=newsletter&utm_medium=email
- Social -> Campaign URL: Contains UTM string i.e. utm_source=facebook&utm_medium=social
- Referral -> Campaign URL is undefined, referrer is the site the user came from.
- Direct -> Both campaign URL and referrer are undefined.
The campaign URL should always take priority and use the referrer as a backup when no campaign data is present to try and work out organic channels.
Summary
You can take attribution much further, but this guide provides the first step to integrating your systems. This has hopefully given you some inspiration around starting to think about attribution and gaining more understanding of how valuable your channels are.
If you need assistance with measuring your key metrics and getting more value through attribution, get in touch.
In 2020, Google released the server container for Google Tag Manager, which allows marketers to move third-party tags from the website into the cloud.
There are a variety of benefits to server-side measurement surrounding privacy and quality control. This article is going to focus on how moving to server-side GTM can improve page speed, as this also provides a key benefit to migrate.
Having a fast web experience matters
Every marketer knows page speed is important; Google released research in 2017 showing 53% of visits are abandoned when a website takes more than three seconds to load on mobile! Customers expect a fast web experience, and a slow website adds friction, so much so that they’ll leave altogether.
It’s also no secret that Google values page experience, with speed being a ranking factor. Using their Visibility Index, Sistrix released insights last year detailing how pages with good Core Web Vitals typically outranked their slower competitors following the Page Experience Update.
As such, marketers are constantly looking for ways to optimise website performance and maximise sales through faster loading times. But there’s a balance to be had, marketers need actionable data insights to drive growth and focus effort.
Enabling measurement can cause some speed decreases. It’s not uncommon to see marketing scripts flagged as an issue in page speed reports. See below, where half of the results flagged are marketing technologies:
How the browser works
When a page is loaded, the browser sends requests to pull content in. This could be assets in the page such as images, files needed to make the functionality work or it could be marketing tags. To manage those requests, they are placed into a queue and executed when called upon, but only so many requests can be fulfilled at a time.
For marketing tags, each technology has its own library that needs to be loaded. This means the browser must request data from a third-party server, download the file and execute the script contained within. This takes resources away from the essential elements of the page.

With server-side measurement, you move the tracking into the cloud. Because rather than relying on the device browser to handle everything, you get the server to do it instead
How does server-side Google Tag Manager improve site speed?
In theory, moving tracking to a server-side environment improves page speed by reducing the load on the browser. Time spent sending requests and downloading tracking data is time not spent on the user experience.
If you were to fully optimise, hypothetically, you could send a single stream of data to your server. From there, you can map the HTTP request to fit the event model expected by the vendor.
In other words, you’re managing all tracking and minimising the amount of third-party JavaScript loaded in the page. This lets the browser focus on user experience rather than handling tracking calculations that the server is better equipped to deal with.
What’s the catch?
There are plenty of benefits to server-side tracking, but the biggest drawback right now is that not all vendors are equipped to handle server-side tracking.
These vendors typically fall into two categories:
Some don’t support server-side tracking, but will hopefully in the future. We’ve seen from our clients that more platforms are coming forward with server-side solutions. So, we’re expecting others to do the same as the technology becomes more widely adopted. As such, you may not be able to realise the full potential of page speed savings – yet…
Others are just not built for server-side tracking, and will always need to run client-side. Think of something like session recording, for example. In these cases, tags need to monitor the DOM (Document Object Model) for any changes; this is inherently client-side and wouldn’t function in a server-side setting.
To conclude…
If you move tags to the server-side GTM container, you will see an improvement in page speed, so long as you’re not running a combination of client-side and server-side. For instance, using Facebook Pixel and the Conversion API simultaneously. In this case, the browser is still doing some of the work.
How much you will gain will depend on the tags you’re using and how many you can push to the server environment. But be aware that where the advertising ecosystem is right now, means it’s still critical to get data through cookies via client-side tracking. In fact, some of the solutions for server-side still collect data from the client, using the first and third-party cookies available.
The industry hasn’t yet found the same level of capabilities within server-side measurement when compared to client-side. Although, expect that to change as solutions develop!
If you’re looking to integrate Server-Side Google Tag Manager as part of your measurement strategy, get in touch.
Designed to create a level playing field for businesses of all sizes the Digital Markets Act (DMA) seeks to regulate the digital gatekeepers to ensure fair competition in the digital space.
In September, the European Commission officially designated the first six gatekeepers as Alphabet, Amazon, Apple, ByteDance, Meta & Microsoft with further announced in October. These companies have a grace period to comply with the act and enforcement will take place from 6th March 2024.
What does the Digital Markets Act mean for Google?
To comply with the DMA, Google is making a number of changes to its products and services with all Google measurement technologies requiring valid user consent.
This applies to anyone with users in the EEA whether or not the advertiser is based there. Advertisers who send unconsented data to Google may face enforcement action, such as data deletion, account disablement, functionality restrictions and more.
As part of compliance efforts, Google recently indicated that advertisers who do not have a basic Consent Mode implementation by 6th March 2024 will have bidding and remarketing suspended.
How does Consent Mode work?
Google’s Consent Mode adjusts measurement technology behaviour based on a user’s consent choices. This allows advertisers to convert signals in a privacy-safe way to recover attribution lost by consent choices.
Using a CMP, advertisers can configure consent categories which is used by Google Consent Mode. From the user’s perspective, this is a series of toggles or checkboxes to enable consent for specific categories. Where relevant consent is provided measurement can function as intended.
If consent is not given, anonymous signals without personal identifiers will be collected as measurement behaviour is modified. This allows you to capture events in a privacy-safe way without the ability to understand an individual’s journey. These events are used by Google to model conversion data and recover some of the lost attribution caused by consent choices.
In its ideal state, Google Consent Mode utilises both consented and unconsented hits to perform this modelling. However, only a basic implementation with consented hits is required before 6th March 2024 to maintain advertising.
There are various methods for the implementation of consent mode, if you think you need support or to act on the recent announcements get in touch with our team who have been supporting our clients with consent management and the implementation of Google Consent Mode.
If you have a CMP. You will lose data from users who do not consent to using cookies. Conversions will reduce and optimisation performance will worsen. Consent mode modelling helps fill the gaps with machine learning algorithms. In fact, Google Consent mode has been shown to recover 70% of reported conversion losses.

What does this mean for advertisers?
- Advertisers will need a functional consent management platform (CMP) on their digital properties allowing users to determine their consent choices.
- As a minimum requirement, advertisers will need to implement a basic set-up of Google Consent Mode in order to pass valid consent identifiers to Google. CMPs such as CookieBot or OneTrust have integration with Google Consent Mode.
- For advertisers still using Google’s Universal Analytics, a migration to GA4 will be necessary to maintain services such as audience and conversion export to Google Ads. So, 360 accounts will need to move.
- Advertisers will also need to update to the latest versions of API/SDK’s for Google Ads and DV360.
Hopefully, you now know more about what DMA will mean for advertisers, and how the act will mean changes to Google’s products and services. To check out more news and insights, check out our blogs, or visit the Data Analytics Team’s page to learn more about what they do. Alternatively, you can check out our LinkedIn to catch up-to-date news and insights.

