Persisting Campaign Data Using Cookies and Google Tag Manager
Most businesses want to know how their marketing efforts are performing, which is why we use tools like Google Analytics to track behaviour on our websites and determine where our potential customers are coming from.
But Analytics has a problem: if a lead fills in a form, the connection between campaign and customer interaction is lost without doing some customised setup. UTM parameters are lost when the user moves around the website, so unless we are sending traffic directly to our contact page, we are unlikely to be able to track the source within our contact form.
In this post, we are going to show how you can perform some simple attribution using ContactForm7 on your WordPress website, and determine where that lead came from. To do so, we will be persisting the source across pages during the session and pushing that information with the form fill so we can determine how that lead landed on our website.
Google Tag Manager Tag Template
For this implementation we are going to use Simo Ahava’s Persist Campaign Data Tag template which will create the session cookies needed for you via GTM.
To apply this to your container once in Google Tag Manager, use the left navigation to access the ‘Templates’ section of the container:
Search the gallery for ‘persist campaign data’ and once you have the sidebar open for the template, click ‘Add to Workspace’ to add the template to your GTM container.
Next, we need to configure the tag to drop deploy a cookie which will track our campaign URLs. Navigate to the tags section of Google Tag Manager using the left navigation, and create a new tag.
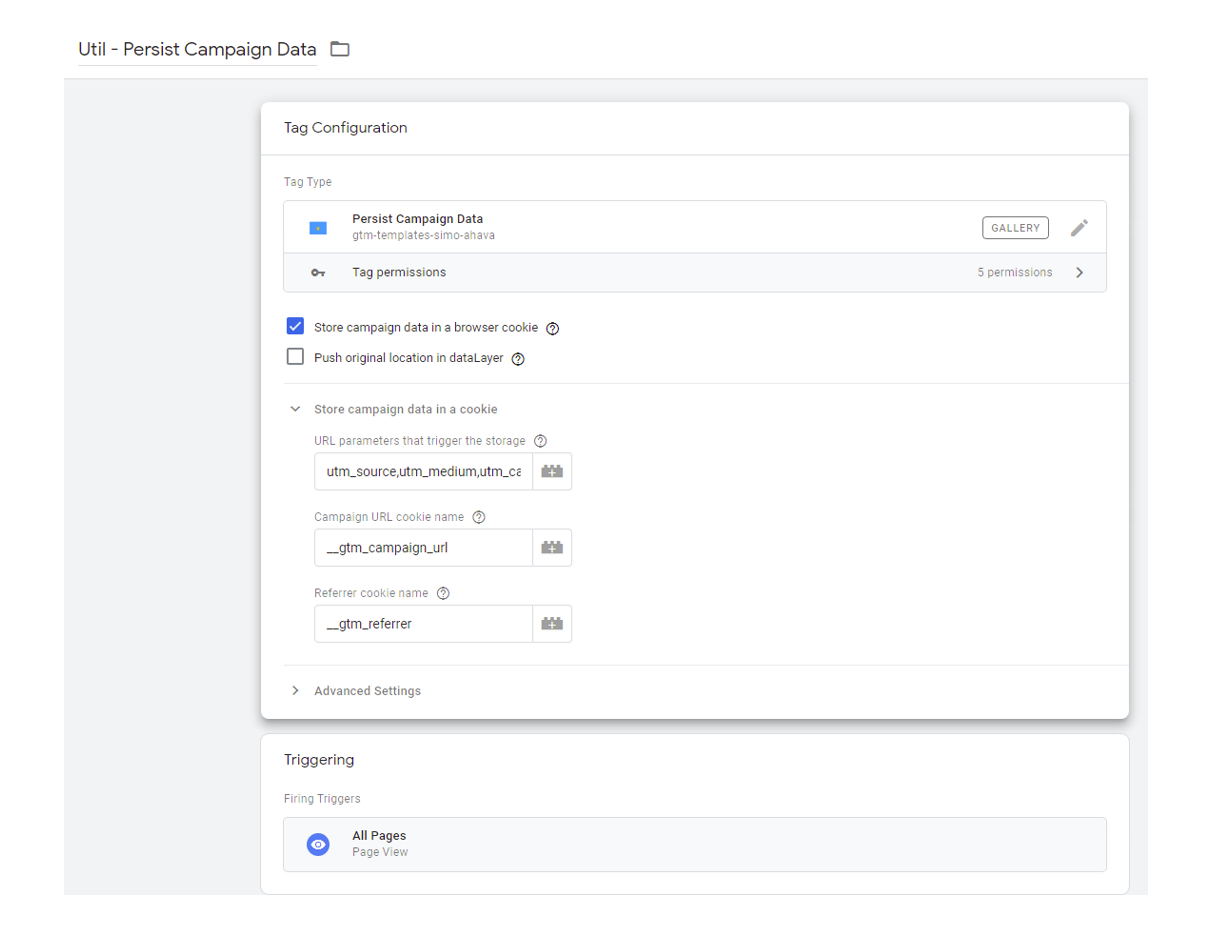
When searching for the tag type, we need to search for ‘persist campaign data’ again to use the template we have applied.

utm_source,utm_medium,utm_campaign,utm_term,utm_content,utm_id,gclid
Everything else has been left as default, and we have added the ‘all pages’ trigger to ensure no matter where the user lands on our website, we have the ability to track their source.
How this template works
The persist campaign data tag template works by matching the parameters set in the ‘URL parameters that trigger the storage’ field. Should those appear in the URL which the user lands on, a cookie is created with the name defined in the ‘Campaign URL cookie name’ field. In our case, it’s ‘__gtm_campaign_url’.
A cookie is also placed containing the referrer. This cookie is named as is set within the ‘Referrer cookie name’ field, and in our case, this is ‘__gtm_referrer’. We are going to use both as part of our analysis.
Using the EditThisCookie extension for Chrome, we can see the __gtm_campaign_url cookie containing the UTM parameters. The value is URL encoded which is why special characters have been replaced, but all source, medium and campaign have been assigned as ‘test’.
Reading Cookies with GTM
In your Google Tag Manager container, navigate to the variables section and create two new variables: one for the campaign url cookie and one for the referrer cookie.
When choosing the type of variable, select 1st party cookie.
Insert the cookie name, either __gtm_campaign_url or __gtm_referrer depending on which variable you are creating. Ensure that you also tick the box for ‘URI-decode cookie’. This will decode the string back into a more readable format.
Once the cookies are set up, if you were to look in the GTM preview mode to see how those appear, they would look something like this:
Creating ContactForm7 Hidden Fields
To transport our data, we need a way of pushing the data through with the form fill, and to do this, we will be using hidden fields. The user doesn’t see these fields and doesn’t have to fill them in manually, but we will use Google Tag Manager to populate them with the data contained in our cookies.
First, we need to create a set of hidden fields. In your WordPress admin section, navigate to the ContactForm7 plugin and either create a new form or edit an existing one.
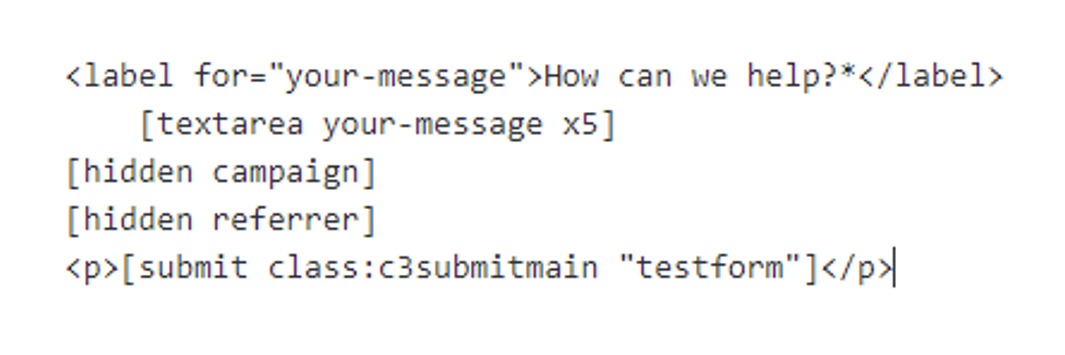
Once you are happy with the form, add two fields just before the submit button by inserting ‘[hidden campaign]’ and ‘[hidden referrer]’ as shown below:
By adding campaign and referrer into the field, we give our field a name that we can use later to tell GTM where to put the information.
Post the form to the live website and make sure the form is still working correctly and visually looks OK on the page.
Placing Campaign Data into the Hidden Form Fields with GTM
We now need to create two Custom HTML tags to transfer the data from cookie to hidden form field. Navigate to the tags section in GTM and add a new tag. Choose Custom HTML as the tag type, and insert the script below, editing the value and selector variables to include the cookie and css selector of the form field, leaving the speech marks in place.
<script>
(function () {
var value = “insert cookie variable to be written”
var selector = “insert css selector of the hidden field”
var field = document.querySelector(selector)
if(field){ field.value = value; }
})();
</script>
If you are using the same naming convention as this post, then the css selectors for each will be the below as denoted in your WordPress admin section.:
- Input[name=campaign]
- Input[name=referrer]
Here is the full tag configuration:
Repeat this process for the referrer cookie, and once completed, both will be ready to transport data from cookie to form field. Now we need to trigger these scripts. Navigate to the triggers section of Google Tag Manager and create a new trigger.
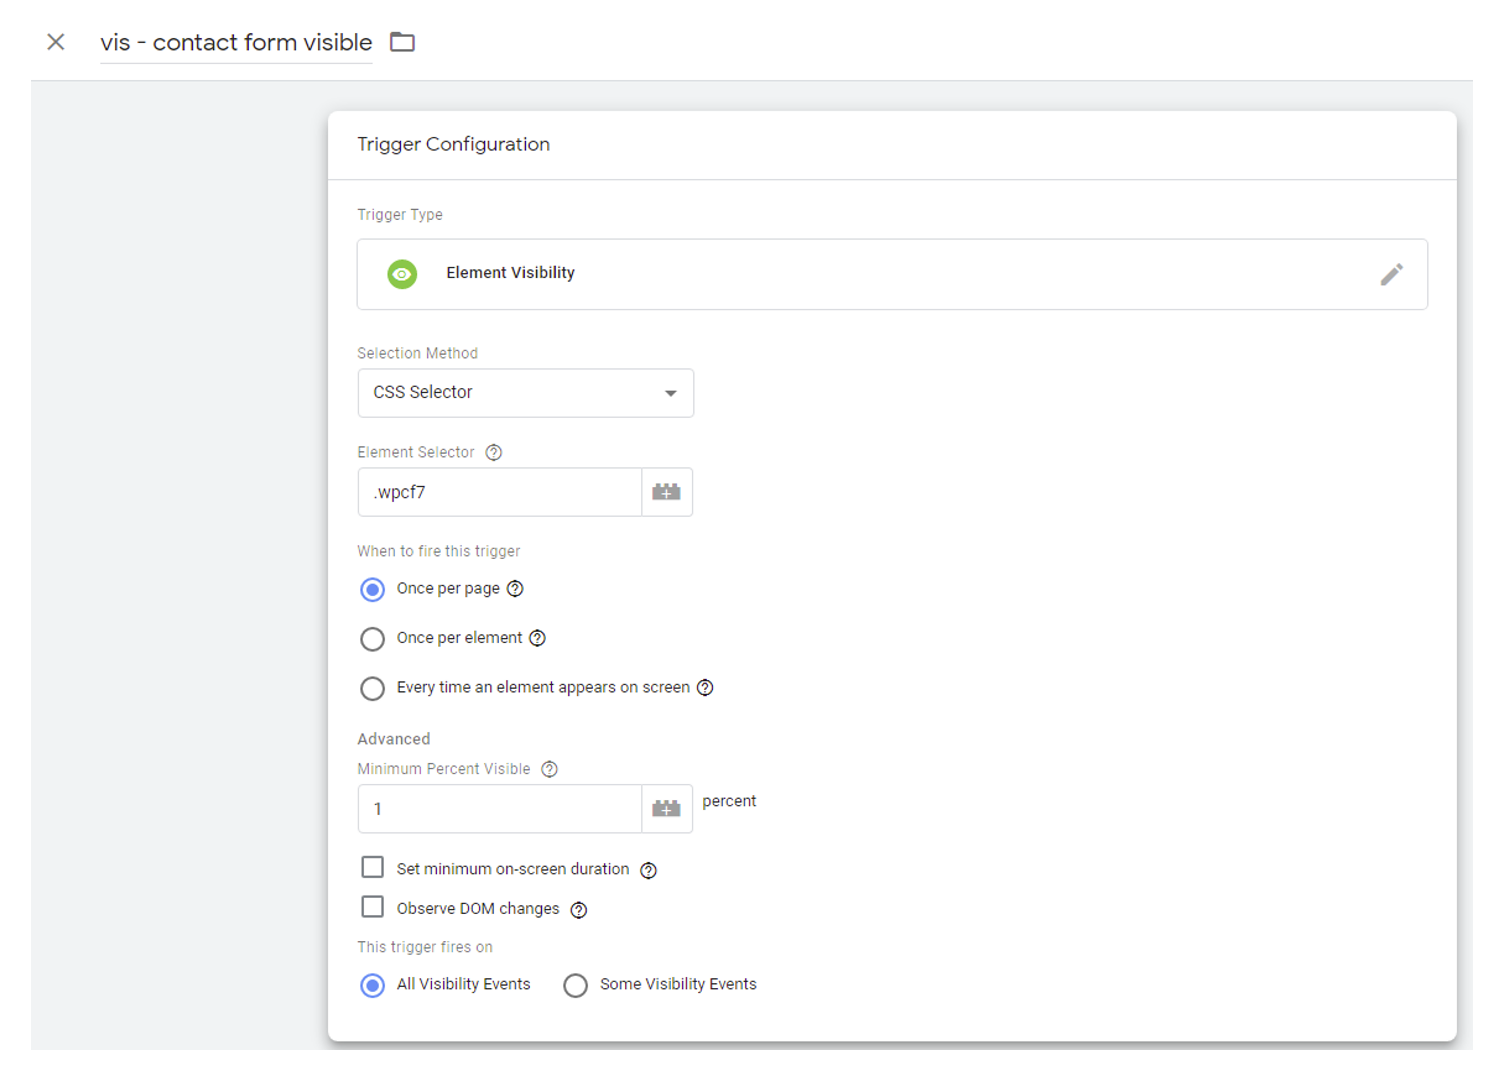
In this example, we have used an element visibility trigger so that no matter where on the website the form is placed, it will always be picked up by the trigger. If you only have one form though, you may wish to use a pageview trigger to denote where the form is.
In our element visibility trigger, we have used CSS selector as the method for determining selection, and then we have used the class ‘wpcf7’ as this class is given to all ContactForm7 forms. In the element selector box we enter ‘.wpcf7’ where the ‘.’ denotes this is a class which is being looked for.
We only want this to fire once per page to prevent duplicated pushes to the value, and then we want to trigger at 1 percent visible so that as soon as the element is seen, our data is transported; even before the user has started to enter their contact information.
The full configuration looks like:
Connect this trigger up to your Custom HTML tags which are set to move the campaign and referrer url data. Then go into preview mode to test the integration is working.
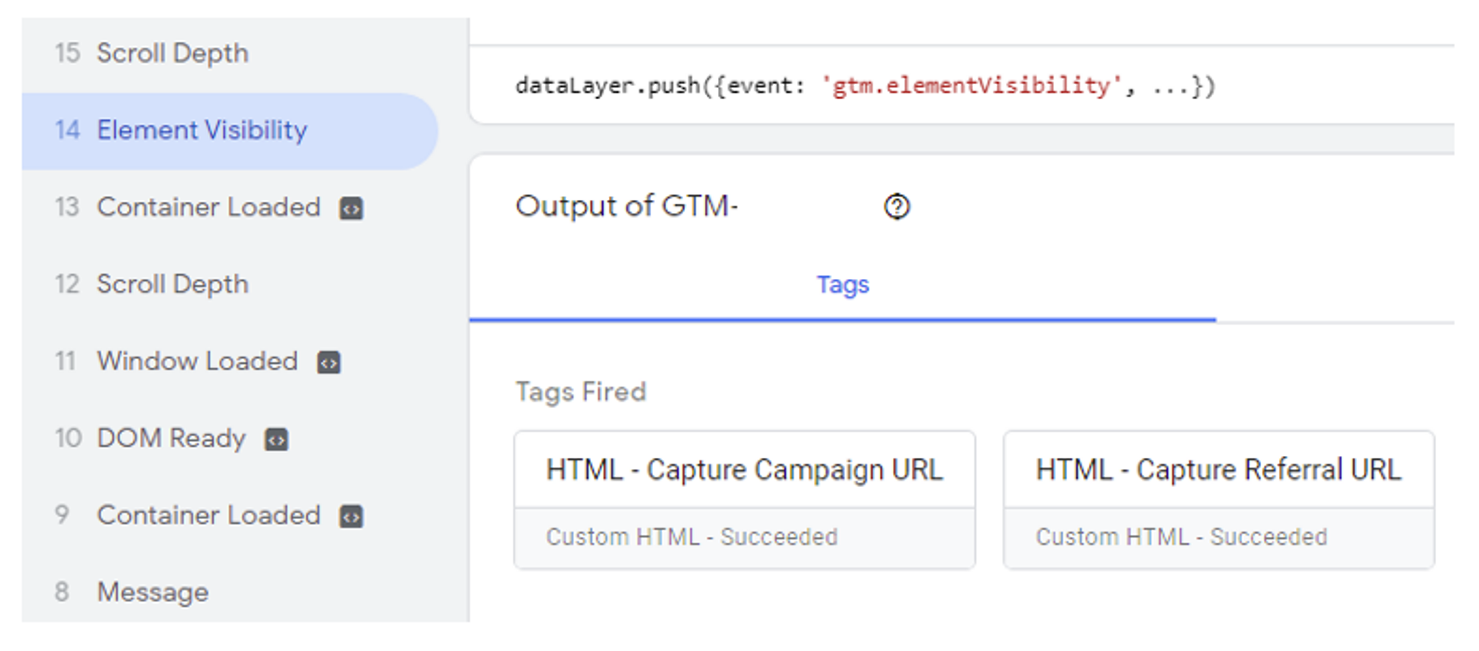
If you’re using the same trigger method as this example, then when you view a contact form, your preview mode for GTM should show an element visibility event. Clicking into this will show you the tags fired. As you can see in the image, both our our HTML tags have fired successfully.
To check the form field values, you should use the developer console. The easiest way to get close is to right-click one of the visible form fields and choose ‘inspect element’ from the drop-down.
We are looking for inputs with the type ‘hidden’. You can see in the image below that the ‘value’ attribute of our campaign field is now the same as the cookie __gtm_campaign_url with the string of UTM’s captured.
If you want to see the field actually in the form on-screen for testing, you can double-click ‘hidden’ and instead type ‘visible’ to expose the field in your browser, but the value attribute will also be the value seen in the field.
Once you’re happy that you are capturing the correct information, head back to Google Tag Manager and publish the container to the live website.
Testing the Integration
There is one final step to take before we start to receive this information within our inbox. We have to alter the email ContactForm7 sends out on form submission.
To do this, go back into your WordPress admin section and find the form within the ContactForm7 plugin. This time, switch the panel from ‘Form’ to ‘Mail’:
This section lets you customise the email sent when a form is submitted.
In the message body, configure the message to your preference and then at the bottom, include the campaign and referrer fields by inserting ‘[campaign]’ and ‘[referrer]’. These are the names given to the fields if you have opted for something different.
In our example, we’ve included labels so it is obvious which link is the campaign, and which is the referrer:
Save the form and then go to the website where you will fill in the form to test the integration (or just wait until you see a form fill come through). Once you have filled out the form, you will receive an email with the information contained within:
So how to analyse this information? If you’ve followed this guide and included the gclid as part of your tracking, then here’s some examples of how to analyse the data. Remember that the UTMs will be dependent on how you have tagged up your campaign links:
- Paid Search -> Campaign URL: Contains a ‘gclid’ parameter
- Organic -> Campaign URL is undefined, referrer is a search engine i.e. https://www.google.co.uk
- Email -> Campaign URL: Contains UTM string i.e. utm_source=newsletter&utm_medium=email
- Social -> Campaign URL: Contains UTM string i.e. utm_source=facebook&utm_medium=social
- Referral -> Campaign URL is undefined, referrer is the site the user came from.
- Direct -> Both campaign URL and referrer are undefined.
The campaign URL should always take priority and use the referrer as a backup when no campaign data is present to try and work out organic channels.
Summary
You can take attribution much further, but this guide provides the first step to integrating your systems. This has hopefully given you some inspiration around starting to think about attribution and gaining more understanding of how valuable your channels are.
If you need assistance with measuring your key metrics and getting more value through attribution, get in touch.


